
Assuming you have already downloaded and install Windows Live Mail (Download load it here if you need it), and you have the login details of you IMAP email account, then let’s get stated.
Last updated: April 2026 with current information from authoritative sources.
What’s New in 2026
This content has been reviewed and updated for 2026 to ensure it provides the most current and accurate information available. Key areas reviewed include:
- Latest product updates and version changes
- Current pricing and availability information
- Updated compatibility with recent software and hardware
- Contemporary best practices and recommendations
- Current year-specific considerations and trends
All information has been verified against authoritative sources to ensure accuracy and relevance for 2026 users.
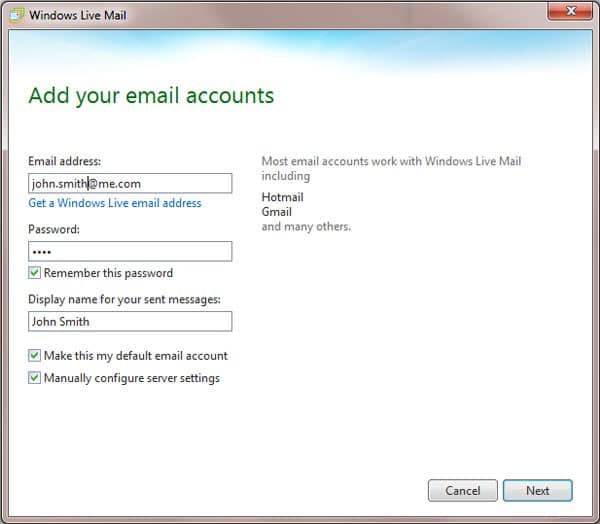
First of all, run the Windows Live Mail program and at the top of the program, click on the “Accounts” tab and then click the “Email” button (it’s got an @ icon with the green + over it). This will bring up the “Add your email account” wizard.
Fill in the “Address”, “Password” and “Display Name” of your IMAP email account and if you are going to be using more than one account, choose whether or not you would like this account to be used as the default email for Windows Live Mail.
Make sure you check the option for “Manually configure server settings” and click Next.
Next in the setup wizard is the “Configure server settings” screen.
Under the “Incoming Server Information”, click the “Server Type” drop down menu select “IMAP” and in the “Server address” add the details for your account along with your “Login user name” below it.
Under the “Outgoing Server Information”, fill in your “Server address” detail also and click Next.
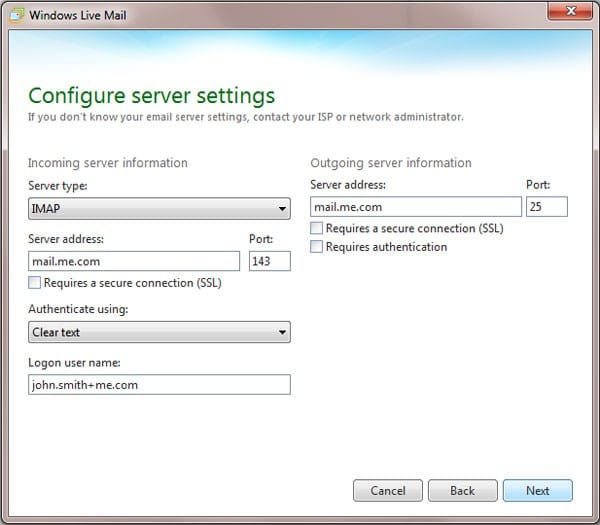
If your IMAP account needs any more info like specific port setting, make sure you fill in the details accordingly.
Now you have finished inputting your details, click on “Finish”. If all has gone well and your details were correct, Windows Live Mail will download your email accounts folders.
Troubleshooting
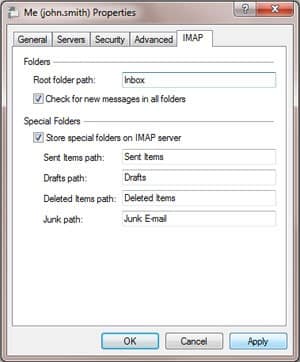
My accounts never seem to set in Inbox correctly so I have to set in manually. To do this, right click on your account on the left and click “Properties”. Then click on the “IMAP” tab and then set the “Root folder path” by typing in “Inbox” and click “Ok”
Another thing to note, if you want to use the IMAP account with a webmail client, you need to make sure both your webmail client and Windows Live Mail are using the same folders. For example, “Sent Items” and not “Sent”.


I’ve set my IMAP account like this for several yr. However, I just went to set up another account and whenever I refresh the folders list the Inbox folder disappears. Any suggestions?
Hi WealthPros,
Have you set Root path folder as “Inbox” with a capital “I” otherwise Windows live mail will conflict with your IMAP server…
Yes, it is written “Inbox”.