CCleaner is ideal for deleting unwanted files from you computer such as temporary internet files and cookies, as well as unused old system files.
CCleaner also has an built in registry cleaner that can fix Windows errors and optimize your computer. All Microsoft Windows computers rely on a system registry to function and as you use your PC over time, the registry becomes littered with unused entries that are created as you add and remove programs. These unused entries bloat your registry and slow down your computer.
Optimizing Your PC
First you want download and install CCleaner from here.
Once you have the program installed on your computer, double click on its icon on your desktop or select it from the start menu.
Using CCleaner is very straight forward as it has an easy to use interface. The program is split into four main sections as you can see below.
- Clean – This tab is used for removing unwanted files from you PC.
- Registry – This tab is used for scanning and fixing errors found in the system registry.
- Tools – This lets you uninstall unwanted programs, choose which programs run at start-up, manage your restore points and a drive wiper to “shred” blank space and completely destroy data.
- Options – From here you can control the various options for the program.
To keep things simple, we are going to use the program on the default settings and we’ll concentrate on the Cleaner and Registry tabs.
Using CCleaner’s Tabs
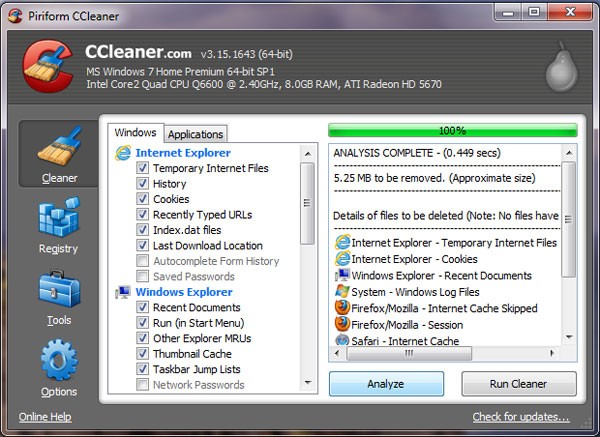
As you can see from the screen shot below, CCleaner gives you the option to select what it is going to delete. I would recommend using the default setting as they are, unless you know what you are doing.
To clean your computer click the “Run Cleaner” button.
If this is the first time you’ve performed a clean, it may take some time as there will be allot of old file to remove. It is not unusual for CCleaner to remove several Gigabytes of old file on the first clean.
Using The Registry Cleaner
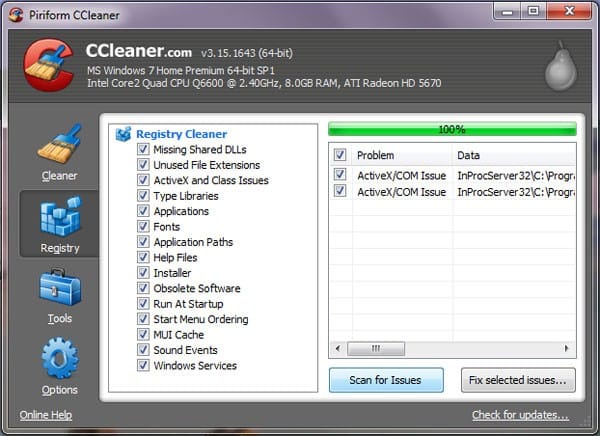
As you can see from the screen shot below, the registry tab lets you select what errors to look for when CCleaner scans your system registry. Again, if you are not sure what you’re doing, it’s best to just the leave the default setting as they are.
To clean your registry, click on the “Scan for Issues” button. Once this is completed, click on the “Fix selected issues…” button where you will be immediately asked if you would like to backup changes to the registry.
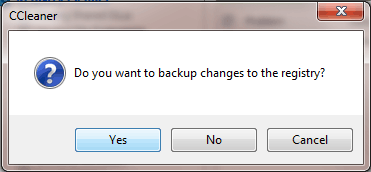
ALWAYS SAY YES TO THE BACKUP!
Just in case something goes wrong and CCleaner removes something it shouldn’t have, you will need the backup to restore your system registry (To be honest, I have used CCleaner on several PC’s over the years and I have never once needed to use the backup but it’s better to be safe than sorry).
Conclusion
So there you have it. CCleaner is a great program that is an essential for keeping your Windows PC running smoothly. And best of all its FREE! Any question or issues, please leave a comment below.